So while I was testing out the new cooling system, I found that the rear hubs were giving up the ghost. To that end, I decided to send them off to a 6-Pack member - Phil. I cannot say enough great things about Phil and the work he does. He rebuilt the hubs and turned them around quickly. I've now driven the car and the rear hubs are absolutely perfect!
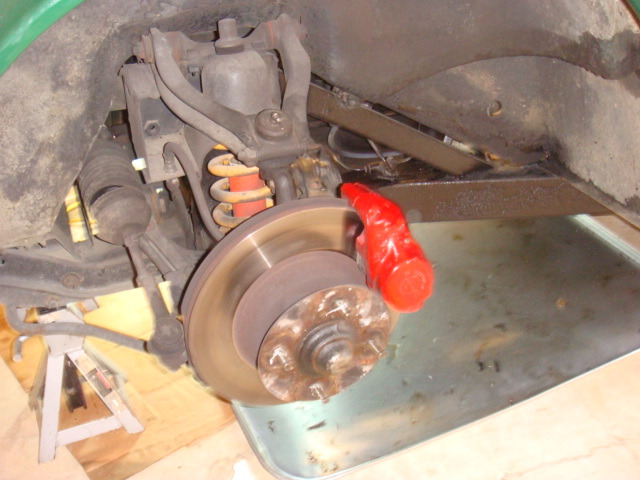
With the car up on stands, I took the time to rebuild the front hubs as well. The front races turned out to be in terrible shape. They were smooth, but worn down so badly that we had put a washer under the stock 'D' washer to allow to take up the slack.
I put the new bearings in the front and the result is great. Slop free bearings, nicely set up and ready to rock!
As with everything however, as I was rebuilding the front hubs, I had removed the brake calipers and was inspecting them. I found a small leak from one of the calipers. Since I had the rebuild kits, I decided to rebuild them. Smart thing to do right?
Wrong..... I rebuilt the calipers and reinstalled them and quickly found I could not bleed them out correctly.
As of right now, I have a car in great running shape with a great looking interior, but I cannot drive it. My father will be here this weekend and we'll take a few mins to try to bleed it out correctly.

Thursday, December 27, 2012
Thursday, December 20, 2012
Cooling System Complete
After fixing the radiator and re-installing it, I was able to finish out the installation of the electric fan harness and complete the cooling system re-do.
The wiring went in pretty well. I was able to tie into the original fuse box in the car to allow picking up the wiring which was electrified when the key was on and the wiring that was on all the time. I also was able to use some of the original holes in the car to mount the relay. I finished the wiring install by wrapping the harness exactly as the stock harness was wrapped, so the whole setup looks like it belongs there.


The wiring went in pretty well. I was able to tie into the original fuse box in the car to allow picking up the wiring which was electrified when the key was on and the wiring that was on all the time. I also was able to use some of the original holes in the car to mount the relay. I finished the wiring install by wrapping the harness exactly as the stock harness was wrapped, so the whole setup looks like it belongs there.
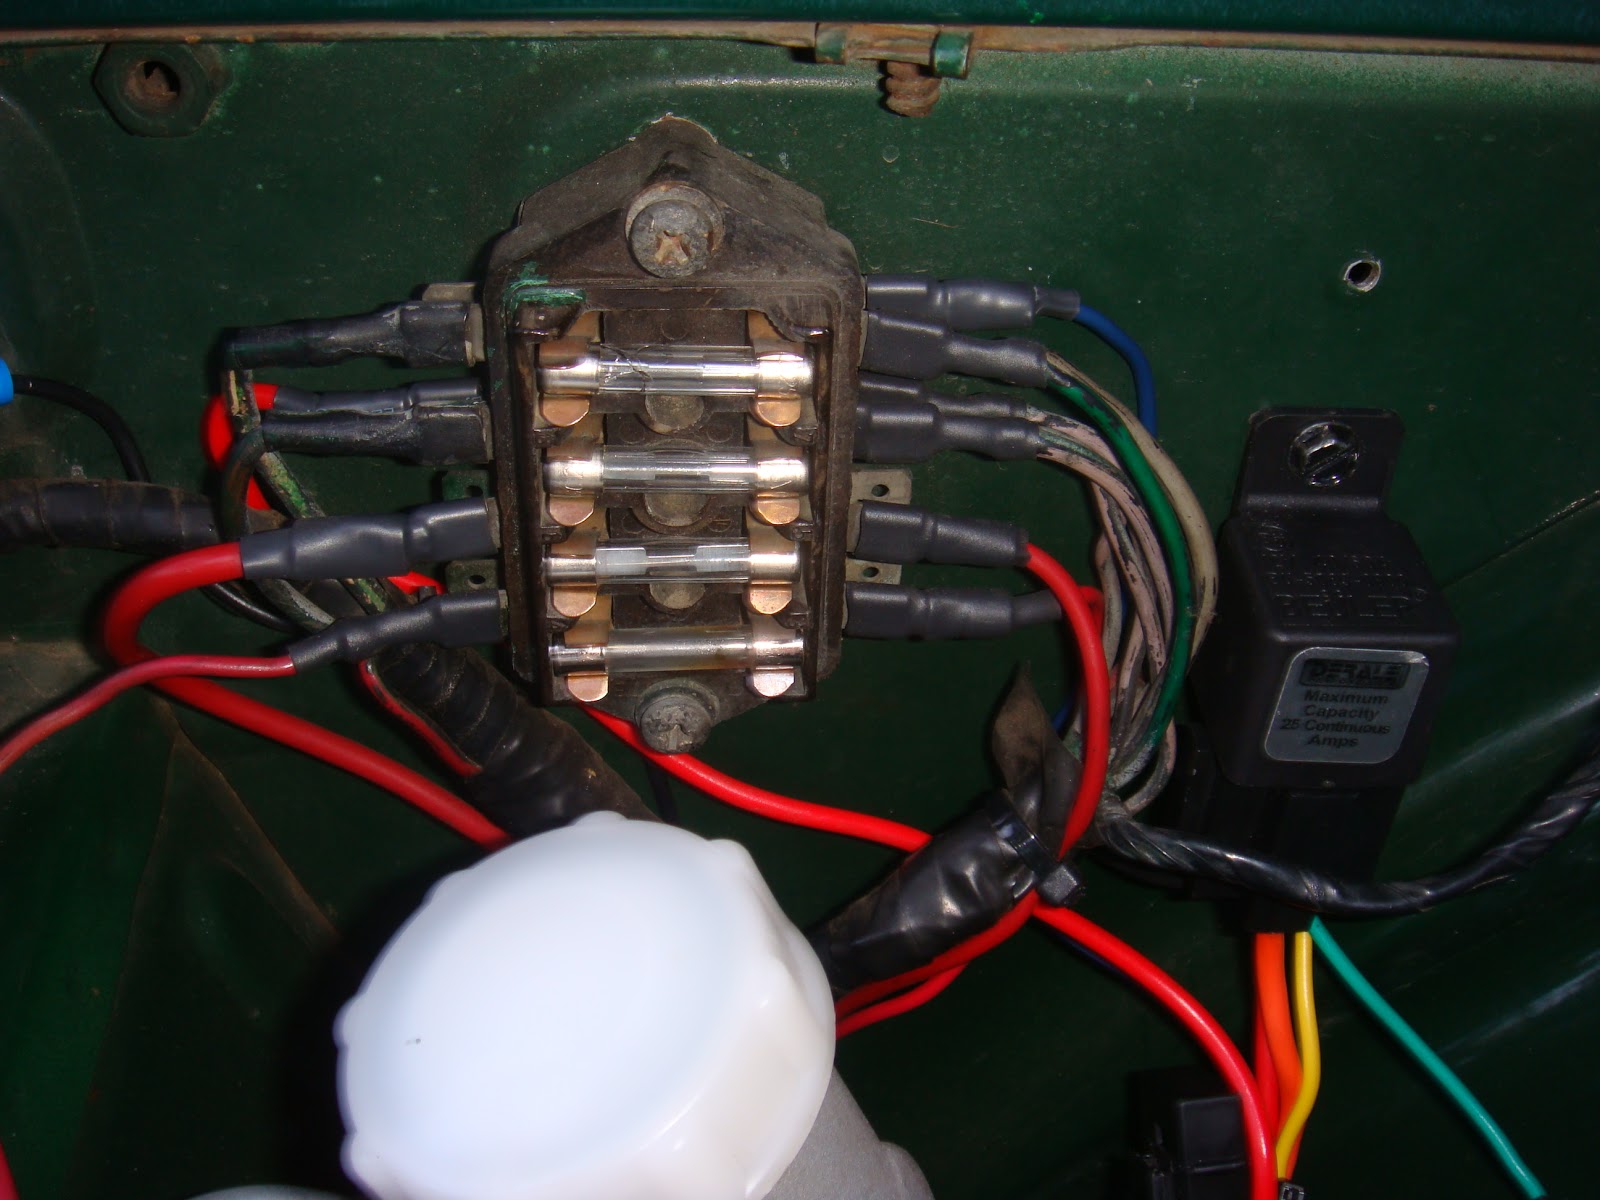


I thoroughly tested the system after installation and everything went really well. I installed a 180 degree thermostat and the system performs perfectly. It cycles exactly as expected and the car runs at a perfect temperature all the time. It also handled the 100 plus degree summer in Memphis with no issues.
Sunday, September 30, 2012
Cooling System Refurb Continued
So where I left off with the Cooling System, my radiator was at the radiator shop being boiled out and soldered up where it had a leak.
Unfortunately, I got a call from the shop and they asked me to come in. When I got there, they had the radiator off to the side. Boiled out, but obviously not soldered up. They basically told me that it had a header leak, and because it was a 40 year old radiator, they would not solder it up. They offered to re-core it for $400, but a new rad is only $260, so I said no thanks and went on my way.
When I got home, I had to figure out how to seal the radiator. I had read that using a vacuum to pull the epoxy into the joint would make the repair much stronger. Talking with a buddy who works on vintage Volvos confirmed that this repair could work.
With all that in my mind, I pulled out the automated vacuum pump I built a few years ago for building composite airplane parts. I sealed up the radiator and then hooked up the pump system and pulled a vacuum. I could hear the leak 'sucking'.
I worked up a batch of JBWeld and spread it around the leaking area. I could actually hear the epoxy being pulled into the leak and then there was silence! After letting the epoxy cure overnight, I pulled a vacuum against the radiator and it held for several minutes. Definitely a successful repair.

Next up, I needed to install the fan on the radiator. I used some self tapping screws to mount the fan to the outer edges of the radiator shroud. This is a definite measure twice, drill once type of job....

With the fan mounted to the radiator, it was time to install the whole assembly back in the car. The fan motor did not clear the frame crossmember. I elongated the holes in the radiator braces to get the fan motor off the crossmember, but will eventually make new longer braces to pull it completely off the crossmember.

To be continued......
Thursday, September 20, 2012
Too Busy To Post!
Well, I've been too busy to post much lately, but that is definitely a good thing!
I've had several projects brewing for quite some time, and finally, I've had time to knock some of them out.
The first project was a re-working of my cooling system.
I was really wanting to install an electric cooling fan on my '73, but had not had the time. I was also interested in flushing my cooling system, getting a leak in the radiator soldered closed and then putting the whole thing back in much better shape than it came out.
After getting all the right parts together - Electric fan (16") and thermostatic switch, new hoses, and fan eliminator kit, I was ready to go.
I started by pulling out the radiator. Came out easily and I managed to not make much of a mess either.

As soon as I got the radiator out, I took it straight to a radiator repair shop to be boiled out and soldered up where I knew it had a leak.
Next up, I pulled out the old fan. It came out really easily, first by removing the fan, then the puck it mounts to, and finally the fan extension. I expected the extension bolt to be very difficult, but it popped right out.
 With the fan extension off, I was able to install the Fan Eliminator kit. Doing this eliminates 6 or 7 pounds of metal and plastic from the end of the crankshaft. The supposed result according to the collective wisdom of the internet forums is that this is good for approximately 6 horsepower on the dyno- Sounds good to me!

 Unfortunately, the radiator shop was not able to complete my radiator as expected, so I went to work changing out the hoses and painting everything I could. The paint work in the front of the car makes all the difference in the world and ensures it won't begin rusting again for at least a while. While I was in there, I also took the time to replace the fan belt.
A few days later, I got a call from the radiator shop and they had bad news. They said they found the leak, but refused to solder it closed for me. They did offer to re-core the radiator however for $400! That is $125 more than a brand new radiator, so I picked up my freshly cleaned, but leaking radiator and headed home.
To be continued........
I've had several projects brewing for quite some time, and finally, I've had time to knock some of them out.
The first project was a re-working of my cooling system.
I was really wanting to install an electric cooling fan on my '73, but had not had the time. I was also interested in flushing my cooling system, getting a leak in the radiator soldered closed and then putting the whole thing back in much better shape than it came out.
After getting all the right parts together - Electric fan (16") and thermostatic switch, new hoses, and fan eliminator kit, I was ready to go.
I started by pulling out the radiator. Came out easily and I managed to not make much of a mess either.

As soon as I got the radiator out, I took it straight to a radiator repair shop to be boiled out and soldered up where I knew it had a leak.
Next up, I pulled out the old fan. It came out really easily, first by removing the fan, then the puck it mounts to, and finally the fan extension. I expected the extension bolt to be very difficult, but it popped right out.


A few days later, I got a call from the radiator shop and they had bad news. They said they found the leak, but refused to solder it closed for me. They did offer to re-core the radiator however for $400! That is $125 more than a brand new radiator, so I picked up my freshly cleaned, but leaking radiator and headed home.
To be continued........
Saturday, September 1, 2012
OVERDRIVE!!!!!
In an earlier post, I mentioned working on the J Type Overdrive in my TR6. It was jumping in an out of overdrive rapidly, and without any circumstance (like a pothole) which would cause an electrical disconnection.
I topped up the oil in the gearbox/OD unit which was low. I also checked all the electrical connection, none of which were loose. Unfortunately, when I did the work, it was not driveable for other reasons, so I could not test it.
Well, late Friday night, I finally got it driveable again and I was able to find out if my fix worked --- Success. The fix worked very well. No popping in and out of overdrive repeatedly.
Interestingly enough, when I was in the process of making the fix, I talked to my father about it and he remembered that low oil in the transmission would cause just the problem I had back in the early 80's with his '74 TR6.
Sunday, August 26, 2012
No News Is Good News - Right?
So, its been over a month since my last post. Since that time, I've been enjoying the TR a good bit. Lots of driving to work and to the pizza place, and generally anywhere my little girl wants to go. Its a lot of fun having someone else as excited about riding in the TR as I am!
However, things have not been perfect in gearbox and overdrive land. about 3 weeks after my last post, the overdrive began jumping in and out of gear again. However this time, it was not when hitting a bump, and tapping on the switch lever had no effect on the problem.
That leads me to believe the problem is elsewhere. Once again, I checked all the leads, and the lead to the solenoid connection was somewhat loose. To remedy that, I tightened the connector with a pair of pliers and reconnected it. After that, I checked the gearbox oil level.
My theory on the oil is this - the Laycock J overdrive is hydraulically actuated via a pump which picks up gearbox oil from the bottom bottom of the gearbox. It then pumps that oil at around 4-500 lbs/in pressure to drive a mating pressure plate which causes the overdrive sun gear and planetary gears to spin.
Back to the theory- If the oil pressure is low, then the pump will cavitate and pump a small bit of air into the piston system and the pressure plate will jump out of the locked position. Needless to say this 'in-out-in' cycle is hard on the overdrive to say the least and not something I want to continue.
So, while I was tightening the connections on the overdrive solenoid, I checked the transmission fluid oil level, and sure enough, it was low. It took approximately 1/3 quart to top it up and I think it overdid it just a little bit. While I mention this, I should say something about oil plugs.
#1 Don't overtighten them. They have a tapered fit, and overtightening them widens the hole just a fraction each time.
#2 The best wrench to put on one is a square socket on a ratchet wrench.
#3 Failing that you have the right square socket, a 7/16" box end wrench.
#4 See #1
I have the car in the air on stands for another couple days, so it will be a couple days to say if this works.....
Thursday, July 19, 2012
Intermittent Connections
So, I've been driving the TR6 every few days to work. This is a 13 mile drive over some billiard smooth roads and some trashed, worn out potholed roads.
The drive has gone well most of the time. However, those potholed roads are a bit of a mess. When I'm riding down those roads, I've found that the car regularly jumps out of overdrive when going over bumps. Pretty annoying, but more than that, it possibly is tearing up the driveline of the car. Definitely a problem I want to get fixed quickly.
To that end, I checked out the 6-Pack forum and only found one picture of the switch disassembled.
I figured it was a connection somewhere between the switch and the solenoid. The quickest thing I was able to check out was the column mounted switch. I checked it and quickly found that one of the two wires was loose. It was riveted to the switch, and the rivet was loose.
I pulled out my pistol grip Weller and some solder and soldered the connection up. Interestingly enough, I found that I had done the other connection years ago. I guess I should have done the second one when I did the first.
Buttoned everything back up and it works perfectly again.
Tuesday, July 10, 2012
Bonnet Closed!
Its been 3 weeks since I've posted. I've driven the Six a lot since then, and I'm proud to say that the bonnet has stayed closed during all that time. I enjoy working on the car, but it is definitely nice to get a break every once in a while!
With that being said, I present the famous Top Gear episode! If you're a TR fanatic, you know the one......
With that being said, I present the famous Top Gear episode! If you're a TR fanatic, you know the one......
Saturday, June 16, 2012
Let There Be Light!
As I've been getting the TR6 back to the kind of condition I hope to get her to, I've been re-doing the trunk.
In earlier posts, you can see the set of trunk panels I've made for the car as well as the effect they have had on the trunk. It definitely looks better.
However, the trunk is really dark. Really DARK! And if I have a flat or other issue out on the road, I'm going to have a real problem on my hands trying to see what I'm doing. To that end, I decided to upgrade the lights in the trunk.
The original setup was a little plastic plinth with connectors jammed on it and a bulb stuck between the connectors. The bulb always popped out easily, the connectors made poor contact, and you'd get more light in your trunk smearing the tail of a lightning bug on your hand.
LED technology has improved significantly in the past few years. You can now get a nice set of bright LED's for very little money. They don't really look the part though on a vintage car, so I decided to figure out a way to install them and not have them stand out terribly.
The bracing inside the trunk has some nice edges to it, so I found that I could install the lights on the inside edge of one of the braces and it would look pretty doggone good. The lighting is good, and they don't look terrible when you don't need them.

Wednesday, June 6, 2012
Another Fix, and a Great Reference!
First off, my wipers have not been 'parking' lately. They'll turn on, I just can't get them to turn off! I've had the problem before, so I knew where the problem was, but never understood how to fix it.
It was really pretty easy. I popped the wiper motor out, and quickly found that was not necessary. Instead, the 'parking switch' unclips from the bottom of the motor gearbox. It just slides out after unplugging the connections from it.
Once out, I took my favorite wiring tool, my stainless brush on my Dremel, and brushed all of the connections off completely. Then I sprayed rubbing alcohol inside and worked the 'finger' that sticks out of the switch. This 'finger' is pushed on by the lump or cam to disturb the circuit and 'park' the wipers. I then hooked the switch up to my multimeter and began triggering the switch with my hand. It did operate as expected and the switch disturbed the circuit when tested on the buzzer in my multimeter.
I plugged everything back up and she runs and parks like a champ.
The other thing I found this evening (thanks again to the guys on the 6-Pack forum) is the wiring diagrams at Advanced Auto Wire. Check them out, and if you own a Six, then bookmark this site!
http://www.advanceautowire.com/tr2506.pdf
Monday, June 4, 2012
Detail Work - Refinishing the Grill and License Plate Lights.
Like I've said in other posts, getting the details right really makes the difference between a nice car and a so-so car. They make the car look better to others and make it feel better to the owner. Plus, much detailing work does not need to cost much - It just takes elbow grease.
So, I was looking over the car's electricals. Most everything works and works well. I noticed the other day however that the license plate lights were no good.
I pulled the assemblies from the car and it was no wonder they did not work well. They were solid dirt!
Here is a picture of both. One which has been washed in warm dish soap, and then polished with Mcguiars plastic polish, and the other which is untouched.
 I also spent some time with my favorite LBC wiring tool. A stainless brush on the end of a Dremel tool makes fast work of cleaning up the connections that Lucas originally made for us. The results are great!

The other work I managed to sneak in this weekend between poopy diapers and Disney movies was pulling the grill and detailing it. I pulled the grill itself, then polished the stainless edge at the top and bottom with Simichrome polish in 0000 steel wool. The results again were great. I did the same with the front emblem.

 I then dug into the alloy rail which goes across the front of the grill with some fine Scotchbrite pads in warm soapy water. Again the rail cleaned up beautifully and really sets the grill off.
After all the cleaning, I pulled the bottom trim piece and after sanding the painted areas down, I laid a nice even coat of semi gloss black on both the grill and the trim piece. Gotta get a picture of the completed assembly to put up here!
So, I was looking over the car's electricals. Most everything works and works well. I noticed the other day however that the license plate lights were no good.
I pulled the assemblies from the car and it was no wonder they did not work well. They were solid dirt!
Here is a picture of both. One which has been washed in warm dish soap, and then polished with Mcguiars plastic polish, and the other which is untouched.


The other work I managed to sneak in this weekend between poopy diapers and Disney movies was pulling the grill and detailing it. I pulled the grill itself, then polished the stainless edge at the top and bottom with Simichrome polish in 0000 steel wool. The results again were great. I did the same with the front emblem.


After all the cleaning, I pulled the bottom trim piece and after sanding the painted areas down, I laid a nice even coat of semi gloss black on both the grill and the trim piece. Gotta get a picture of the completed assembly to put up here!
Thursday, May 31, 2012
Hardtop!
Based on some plans found on Brosky's site, I made up a stand to put my hardtop on.
While I was at it, I checked out the condition of all the seals and the rest of the hardtop.
There is a lot of work to do on it to bring it up to usable status again....

While I was at it, I checked out the condition of all the seals and the rest of the hardtop.
There is a lot of work to do on it to bring it up to usable status again....

Thursday, May 24, 2012
Now I Can Stop!!!!
At this point, I'm going to claim victory!
With the new master cylinder and the rebuilt PDWA, the car is in great shape. After installing those two components, the bleeding of the system took my father and I about 20 minutes. That tells me how bad the master cylinder really was.
Since then, I've also done a little more work under the hood, and a little paint work on the exterior.
Under the hood, I got out some heat shrink tubing and began tidying up some of the connectors inside the engine compartment and around the fuse box. Really makes things look much nicer and reduces the chance of shorting something.
On the exterior of the car, I painted the rocker panels with some semi-gloss black paint. Of course I taped off everything first.
I'd have pics in this post, except I lost the little adapter which allows me to upload pics from my camera to the computer!
The upshot of all this work is that I drove the car to work this week, and also drove it on all my errands this week. Gotta love it!!!!
Wednesday, May 16, 2012
Not So Fast!!!!!!
Well, my post that the car was/is back on the road was premature.
Unfortunately, I found that the PDWA and the master cylinder both appear to be leaking. New parts are on the way to the house, so hopefully this weekend, I'll finally resolve this.
Unfortunately, I found that the PDWA and the master cylinder both appear to be leaking. New parts are on the way to the house, so hopefully this weekend, I'll finally resolve this.
Saturday, May 12, 2012
Rest in peace Carroll Shelby.
NYTimes Story on Carroll Shelby
Few people have had such an influence on the automotive industry. While his idea was not entirely a new one, he did it in such a devastating fashion, the effect has been known for 50 plus years on.
Shelby also did things with style, and with a marketing edge that few have matched. While his style with the car suggested that of using a bigger hammer, his style in marketing was somewhat more refined. In the end, the word 'Cobra' will never be associated with anyone else again.
May the road always be smooth and the wind at your back Carroll Shelby.

Friday, May 11, 2012
Back On The Road....
So, the green monster is back on the road.
Took too long, but I got it there. Yesterday, my buddy Matt came by and we took an hour or so to bleed the brakes and get the braking system running- or stopping I should say.
The first couple of rides and the rear brakes got pretty doggone hot. It seemed like the rear brakes were set too tight. I got out a wrench and re-adjusted the rears and took it for a spin. The result was much better than previously.
So, while the car sat on stands, I was able to complete the following....
- Reupolstered most of the trunk
- Rewired the coil
- Repainted the wheels and wheel centers
- Repainted and refinished the steering shaft
- Repainted and refinished the rear of the exhaust system - Tried to get it looking like a Monza exhaust tip
- Repainted and refinished the rear braking assemblies and drums
- Installed new rear wheel cylinders
- Installed Speed Bleeders in all cylinders.
- Repainted and refinished the brake booster
- Repainted and refinished as well as rebuilt the master cylinder
- Rebuilt the PDWA
- Installed new flexible lines in the rear brakes
- Installed new flexible lines in the front brakes
- Repainted and refinished the front brakes
- Installed new brake pads in the front brakes
The results are pretty doggone good!


Thursday, May 3, 2012
Still not there....
So the PDWA was leaking. I ended up ordering the correct o-rings for it, and then waiting for them for a week. That put getting it back on the road off another week.
The o-rings came in and I quickly rebuilt the PDWA. While I was waiting for the o-rings, I ordered some speedy bleeders.
The Speedy Bleeders are a slick little piece of kit. Put a springloaded one way valve in a bleed nipple and you get the idea. A little expensive, but they work well.
So with the rebuilt PDWA and the Speedy Bleeders added to the brake rebuild, I set to re-bleeding the brakes. Something was very wrong however.
As I bled the brakes, the rears were very hard to work, but the fronts went extremely well. The rears were quite a problem. Despite many tries to bleed them, I eventually got not much of anything coming out of the lines. I continued to try bleeding them, but made little progress. Eventually, I checked the rear brakes for the umpteenth time and found puddles under the rear of the car.
The puddles however were not under the wheel cylinders, but instead under the frame.... A quick wave of the flashlight showed that the rear flexible lines were leaking profusely. I split the lines!!!!
So, new lines for front and rear are now on the way. With a little luck, I may get to drive the car to work next Friday.........
Saturday, April 21, 2012
Not quite there yet.....
So, we're back from Disney. The kids had fun, but I've had enough of the crowds and the running around!
As soon as I was back, I convinced my wife to dive into the braked with me and bleed them. Unfortunately, I had a continual stream of bubbles in the system. This happened with the rear brakes and the front brakes as well. I dropped it off the stands, but the brakes were terribly soft. At that point it was time to figure out the cause of the bubbles.
I checked all the connections and found none loose. However, there was a little brake fluid under the PDWA. Not a good sign. I tightened the connections and wiped up the mess. Afterwards, I decided to check the bleed valves and the passenger side front valve stripped!!!! All of a sudden, I had fluid pouring out on the floor. In a moment of creativity, I plugged the bleed kit on it and just let it run.

After that, I called it a night.
The next morning, I came out and sure enough, the system emptied itself into the bleed canister. I did some research and found that the bleed screw for my car (16PB calipers) is a M10x1.0 bleed screw. I also found them available at Autozone, so this morning I picked one up. Its a good fit, and the caliper does not seem to be terribly stripped.
Next up, I topped up the resevoir and promply found more fluid under the PDWA. The source was in fact the PDWA itself. The seals on the piston have apparently given up. I don't have a PDWA repair kit, so I plugged the PDWA. This is an ok way of handling the problem in the short term (the brake warning light did not work anyway), but I will order a kit in my next parts order.
Hopefully, tomorrow, I'll get my wife back in the garage for a bit and get the brakes bled and my '73 back on the road!

Saturday, April 14, 2012
Nearing Back On The Road
So, its nearly back on the road. Just one final step and she's ready to go.
So here is my list...
Rear drum brakes - stripped, repainted, new wheel cylinders
Rear Trailing Arms - Helicoils in all studs
Front Brakes - Stripped and Painted Calipers, new brake pads
Master Cylinder - Stripped, repainted, rebuilt
Wheels - Wheels and Centers stripped and repainted
PVDA - Stripped, polished and clearcoated
Steering Shaft - Stripped and Repainted
All that is left now is to bleed the brakes and she's back up and running.
Sunday, April 1, 2012
More of the Good, Bad and Ugly
So there is good news in this story.... (see earlier post for the story)
The good news is that there is nothing wrong with the threads in the trailing arm. Not stripped, not even worn out. Everything threaded back together nicely.
However, I've decided to put steel inserts in the trailing arm to reinforce the holes. I did the driver's side years ago, and now its time to do the passenger side. To make the job easier, I'll be using the jig from Patton Machine. Sixpack member Poolboy offered to ship it to me to let me use it. Should make the job easier than when I did the driver's side.
I'm now waiting for the parts to install the wheel cylinders (one set was completely missing) so I'm going to pull a few other things off the car and work them over to get them right.
In the meantime, I've painted up the drums, stripped and painted the backing plates for the brakes, and have most of the car ready to go back together.

Thursday, March 29, 2012
The Good, The Bad and The Ugly Again!
I've been thinking for some time now that the rear hubs in my car were coming apart or at least seriously worn out. This is something that happens with TR6's and definitely with 40year old TR6's, of which they all are... The car had been wobbling in the back end when I'd go over any crown in the road. As I mentioned, the back end was wobbling.
The bad news is that I replaced the hubs approximately ten thousand miles ago. They should not be bad by now.
So, the other day, the car began to clunk when going over bumps. I knew the sound was the sound of loose mounting bolts holding the lever shock in place on the right trailing arm.
I pulled the wheel off to tighten up the mounting bolt, but found that the wheel was wobbling terribly. A very serious flopping...
So after tightening up the lever shock, I grabbed the drum and wiggled it. However when I did, the backplate wiggled with it..... Yikes. I decided to pop the drum off and put a wrench on the nuts/studs that hold the hub in the trailing arm - and as the drum came off, something fell out of it. Definitely an ugly sign.
I checked and quickly found the hole the stud came out of. I tried to insert the stud, and there was nothing to bite on - Uglier yet.
The good however was/is that the rest were just loose. I tightened up each of the remaining studs and the hub was then completely tightened up. Not perfect, but still significantly tighter than before and perfectly usable.
So now, its time to get my hands on some helicoils and fix the trailing arm. I thought I had done them all years ago, but apparently not all of them.
Saturday, March 17, 2012
Cool It!!!!!!
When I rebuilt my '73 back in 1990, we went back original with pretty much everything. We even went back with the fiberboard radiator shroud that the car had when new.
Unfortunately, just like the original, water damage from daily driving destroyed, warped, wore the fiberboard construction of the replacement shroud we put back in. It lasted probably 6 years and then I removed it. No radiator shroud since.
After seeing all the good looking shrouds in forum posters' cars, I really wanted to put one back in there. I looked all over for fiberboard and other appropriate materials, and then while drooling over Francois' shroud that he used to manufacture, I thought I saw that it was made from corrugated/fluted plastic sheet, with his gorgeous stainless shield on top. (still not sure I saw that right).
The common name in the US for that product is Coroplast. Its what you usually see in realty and election signs. Most are done in white, but it comes in a full range of colors. I know its tough too - many of my flying friends used to make radio controlled combat aircraft out of it and 'destroy' the competition with their planes.
I figured I oughtta give some a try, and by chance the plant I run shares a roof with the local Coroplast distributor. Ended up that I was able to get an 8x4 sheet of the stuff for $12.50. That sheet will make about 6 shrouds by the look of it.
With a ruler and a vague memory of what the original shroud looked like, I set to work. I first measured the 'top' of the area where the shroud would go. After cutting the top, I was able to cut a piece for each side, and after 5 mins of trial and error, I had a workable part.
For this first one, and since I have so much extra, I decided to give it a try with some tape to hold it together and to see if I have the fluting going the best direction. I may try another with the top fluted in a different direction.
I also need to come up with a way to join the top and sides, so will likely use some thin L bend aluminum and rivets/washers to hold it together. Polish the aluminum and it should look really good.
Like I said, this is just the first effort. The next one should look much better. When I get my final version done, I plan to use some of the graphics from the site Bobby D put up the link to and have my local sign guy knock something out in chrome for the top.

On another note, I've done a ton of work on the car in the past few days, but it has only involved about $10 worth of parts!!!
What on earth could result in that much work from such a small dollar amount? Grommets and Bulbs.
Grommets are generally cheap, but they make a huge difference in the appearance of the car. Even bigger yet, they keep the interior fume free! With the goal of eliminating the fumes in the car, I've replaced almost all the grommets in the firewall, and now the grommets in the kick plate/parcel shelf as well. Hopefully that will help with the smell.
As for the bulbs, my instruments were a bit dim, just a bit hard to see when the sun went down, so I decided to replace as many as I could while I had a few things out of the way to give access. Its not dark yet, but so far, they do look a bit brighter. Should be a big improvement!
Sunday, March 11, 2012
Devil Is In The Details
As the title, the Devil is in the details! Its the little things that make all the difference.
A little shiny paint is a big attractor. It makes your car look good, but if you paint all the wiring grommets and the wiring harness, it begins to look like crap. Small parts that are dirty and chipped look terrible. And a large group of small chipped parts looks like a large chipped, rusty mess.
So for a couple months now, I've been pulling off at least two parts a week and reworking the. Strip them, prime them and repaint them. Get them all right, and over time, the engine bay begins to look great. Same for the rest of the car.
Here are some of the parts I painted up this weekend.


The parts are starting to add up, and as a result the engine bay is really starting to look good!
Thursday, March 8, 2012
University Motors - John Twist
Great video from University Motors - John Twist. John takes on a testy TR6 and brings it back up to tune.
Tuesday, March 6, 2012
Chasing Gremlins
Old cars were not perfect when they were designed. Even the Jaguar XKE had its issues. Now these same cars are much older and with time comes age related flaws......
Inattention also breeds issues. Unused seals wither and crack, hoses get old and vinyl begins to look like the floor of the Mojave desert.
Finally, when you're away from something for so long, you forget how it should operate, how it should sound and the way it really should perform.
Inattention over the years really wore down my '73. All the things above happened and in many bad ways. The good news however is that I like fixing things. A couple posts previous, I listed a huge list of things that I've set right on the car - and had fun doing it.
All through that work, as I drove the car, it seemed to run well, but it was somewhat down on performance. Idle kept climbing, power seemed good but not great. Finally, it backfired and popped at odd times.
Then I read on the 6Pack forum about a different way to set the timing on a car. Instead of using a timing light like in days of old, the thing to do is to use a vacuum guage.

So the process is simple. Get the car warm and at an idle of 900rpms. Then take a gauge reading from the vacuum gauge with it attached to the intake manifold. Simple!!!! With the cam I have installed, the initial goal vacuum measure was/is 13HG. Stock Sixes start usually at around 18HG!
Not so fast..... The car warmed up easily enough. 900 rpm idle was the issue. As I mentioned above, the idle has been climbing over time, to the point that the car was now idling at about 1200 rpms. Not a lot of fun. And not very good for getting good readings. So first order of business was/is getting the idle right.
I decided to give it a whirl first and get my reading. First reading was 6HG!!!!!!! Yowza! Severely retarded my ignition was. I started advancing the ignition (twisting the disty) and got to 10HG, but that was with an Idle of 1400RPMS. The test drive however told me I was on to something. The car was definitely not tuned correctly before - and I did not know it because it had been so long since I had driven it. With the ignition advanced, the thing had loads of power. Stump pulling power, the power of a modified TR6!
With help from the 6Pack forum members, I began chasing down the cause of the high idle. It eventually took all weekend, but I found that most of the cause of the high idle was an improperly rebuilt bypass valve on the Zenith Strombergs.
 With the right gasket in the valve, the right seal in the adjuster (in the background in this pic), I finally got the car to idle at approximately 950 rpms and 12HG. A pretty cool number. So better performance is on the way!
Inattention also breeds issues. Unused seals wither and crack, hoses get old and vinyl begins to look like the floor of the Mojave desert.
Finally, when you're away from something for so long, you forget how it should operate, how it should sound and the way it really should perform.
Inattention over the years really wore down my '73. All the things above happened and in many bad ways. The good news however is that I like fixing things. A couple posts previous, I listed a huge list of things that I've set right on the car - and had fun doing it.
All through that work, as I drove the car, it seemed to run well, but it was somewhat down on performance. Idle kept climbing, power seemed good but not great. Finally, it backfired and popped at odd times.
Then I read on the 6Pack forum about a different way to set the timing on a car. Instead of using a timing light like in days of old, the thing to do is to use a vacuum guage.

So the process is simple. Get the car warm and at an idle of 900rpms. Then take a gauge reading from the vacuum gauge with it attached to the intake manifold. Simple!!!! With the cam I have installed, the initial goal vacuum measure was/is 13HG. Stock Sixes start usually at around 18HG!
Not so fast..... The car warmed up easily enough. 900 rpm idle was the issue. As I mentioned above, the idle has been climbing over time, to the point that the car was now idling at about 1200 rpms. Not a lot of fun. And not very good for getting good readings. So first order of business was/is getting the idle right.
I decided to give it a whirl first and get my reading. First reading was 6HG!!!!!!! Yowza! Severely retarded my ignition was. I started advancing the ignition (twisting the disty) and got to 10HG, but that was with an Idle of 1400RPMS. The test drive however told me I was on to something. The car was definitely not tuned correctly before - and I did not know it because it had been so long since I had driven it. With the ignition advanced, the thing had loads of power. Stump pulling power, the power of a modified TR6!
With help from the 6Pack forum members, I began chasing down the cause of the high idle. It eventually took all weekend, but I found that most of the cause of the high idle was an improperly rebuilt bypass valve on the Zenith Strombergs.

Sunday, March 4, 2012
Thursday, March 1, 2012
Winter Work Summary....
So winter seems to be most 'car guys' time of the year for some heavy duty work.... I live in the South though. We don't have 'winter' like a lot of guys do. That did not mean I did not get a lot done on the car this winter though....
Here is the list of what I've done since December:
New Windshield, Seal and Trim (Insurance claim)
New Clutch
New Throw Out Bearing (Koyo)
New Clutch Master Cylinder
Rebuilt Clutch Slave Cylinder
Stripped and Clearcoated Clutch hydraulic line
Rebuilt Both Carburetors
Buffed Carburetor Dashpots
New Fuel Lines from Gas Tank to Carbs
New Gas Tank
New Gas Tank Gauge Sender
In-Line Fuel Cutoff
Stripped Floorboards and Fiberglassed Holes
Derusted and Repainted Charcoal Canister Bracket
Derusted and Repainted Anti-Runon Valve
Reinstalled Emission System (canisters and ARV)
Stripped and Repainted Thermostat Housing
Stripped and Repainted Valve Cover
Installed New Valve Cover Gasket
Stripped and Repainted Air Cleaner
Installed New Air Cleaner Elements
Stripped and Repainted Oil Filter Canister
Installed Spin-on Oil Filter Adapter
Stripped and Repainted Grill Braces
Stripped and Repainted Radiator Braces
Stripped and Repainted Cowl Vent
Buffed and ReOiled Dash
Buffed All Exterior Paint
Buffed All Exterior Chrome
Added Wheel Rack to Bicycle Rack
Installed New Battery To Starter Cable
Rewired Fog Lights
Rewired Radio
Stripped and Repainted Wiper Arms
Stripped and Repainted Wiper Motor and Bracket
Bled Brakes All Around
Installed New Oil Pressure Switch
Removed Supplementary Oil Feed Line
Soldered Tail Light Bulb Sockets
Installed New Turn Signal Lenses Front
Wednesday, February 22, 2012
Backtracking A Bit....
So, I got my car back on the road just before Christmas. It was on the stands in the garage, but how did it get there.....?
Throughout the 90's the Six was my daily driver and occasional autocross and track day car. I drove it like crazy and ran it hard. It started with me as a wreck, I turned it into a show car, and the daily driving turned it back into a daily driver. Along the way, a lot of stuff wore out, worst being the transmission. By the middle of the 2000's, she would not shift except if I doubleclutched it hard.
My wife and I were about to become parents, so I decided to yank the tranny and rebuild it before my daughter arrived. We all know what they say about the best laid plans....
With the tranny out and measured up, I found that it really was worn out. The bearings in the bottommost shaft were shot as well. After having a machine shop work the bottom most shaft over and getting all the right parts, I began looking for synchros. No luck. I wanted NOS parts as I had been told that the repros were crap.
Several years passed, my daughter was born, learned to walk, learned to talk, and still the car was on stands.
Then I lucked into a set of genuine NOS synchros and a clutch kit. By myself, I wrestled the tranny back into the car and hoped to get it back on the road. Unfortunately, something was wrong, and it would not shift at all. I could not figure out what I did wrong.
After pulling the tranny back out and going through everything with a digital micrometer (everything was correct), I decided to check the clutch. Lo and behold, it was not close in dims to the old one. Since the 'old' one only had about 5k miles on it, I stuck it, and a new friction plate in and she shifted like a new car!
So on my 2011 birthday, my car was back on the road and driving!
My buddy Matt helped me put the transmission back in the car this last time, and he is a Triumph fanatic (of the 2 wheeled variety), so we had to go tear up some backroads and get a cool pic of the Triumphs together......
Sunday, February 19, 2012
Boxes At The Door....
Boxes at the door mean a busy weekend!
I'm currently in the middle of a bunch of repairs on the Six. As mentioned in the previous post, a smell of gasoline led to a huge list of fixes. The final task was/is installing a new gas tank in the car.
That task is near complete, but not quite yet.


So a new master cylinder is now in the car, as well as a rebuilt slave cylinder.
While I had the Master and Slave Cylinder out of the car, I decided to change the oil and pull the oil filter canister. I wanted to paint up the canister and get it looking right. I stripped it and painted it up.

While I had it out, a friend on 6-Pack forums offered a modern oil filter adapter for the car at a price I could not pass up. So that filter adapter is on the way, but I'll wait to oil the car back up until it is here. Thanks Ken!
Oh yeah, one other detail.... I got a used Carbon Canister bracket from another 6-Pack member and plan to strip it, paint it and re-install it on the car as soon as possible. Thanks Steven!
So, its another week off the road, but she'll be so much better when done!
I'm currently in the middle of a bunch of repairs on the Six. As mentioned in the previous post, a smell of gasoline led to a huge list of fixes. The final task was/is installing a new gas tank in the car.
That task is near complete, but not quite yet.

This has also reminded me that that the trunk looks like hell.... Evidence of 3 different body colors during the car's life, as well as damage from the gas leak. Definitely a task for this summer. I need to get the paint straightened out and get the thing looking ok again.
However, the boxes at the door were for other tasks....
First up, while the car was on jackstands, I found that the clutch master cylinder was leaking. As soon as I found the leak, I drained the system and pulled the cylinders out of the car. The slave last got a kit put in it back in the late 90's, so it was due. I decided to replace the master cylinder outright. What I found was that the cap was trashed, the return spring was broken, seals worn out and the pushrod clevis pin holes were worn flat out!
I would have rebuilt the master cylinder (have done it plenty of times before) but I found that the cost of the parts was near the cost of a new assembly, and the pushrod is no longer available by itself. I'll go ahead and rebuild the master when I find kits on sale at TRF, and keep it as a spare.

So a new master cylinder is now in the car, as well as a rebuilt slave cylinder.
While I had the Master and Slave Cylinder out of the car, I decided to change the oil and pull the oil filter canister. I wanted to paint up the canister and get it looking right. I stripped it and painted it up.

Oh yeah, one other detail.... I got a used Carbon Canister bracket from another 6-Pack member and plan to strip it, paint it and re-install it on the car as soon as possible. Thanks Steven!
So, its another week off the road, but she'll be so much better when done!
Friday, February 17, 2012
A Can Of Worms
When you're working on a car your own age every job you take on seems to lead to another. I think thats due in part to the age of the car, the miles it has traveled, and also because of the way it was designed. Lets face it, they did design fine cars back then, but we do know a little more 40 years later on how to design a proper widget.
My own current can of worms started with a stink. After bringing my '73 back to life, the garage quickly filled with a strong odor of gasoline. Not a faint whiff like you left the cap loose on the lawnmower, but a strong odor, enough to fill the garage and make me scared to flip the light switch for fear of igniting an inferno!
First, I went after the usual subjects. I tightened the screws on the fuel pump, replaced all the fuel lines in the engine bays and did a full rebuild on the old Zenith Strombergs. All that effort actually did help, and some of the odor began to go away.
It was not all gone however..... and my wife was quick to let me know about it.
I then remembered that I had disconnected the carbon cannister and removed it from the car years ago. All the vent lines were venting to the atmosphere. A call to my father had him looking through the stash of old parts I had stashed in my parent's garage over in Arkansas. Those boxes had not been touched in about 15 yrs, but Dad found the canister anyway.

US Postal delivered the box a few days later and it took me no time to hook it back up in the car. Problem Solved!
Wrong.....
The only thing left that I could replace was the main line from the tank to the pump. So, up on the stands the car went and out came the line. Not before giving me a nice gasoline shower however. Gave what little hair I have left on my head a nice sheen.
While I was under there, I noticed a drip from the spare tire well. Not an active drip, but the evidence of one that had gone on too long. I touched my finger too it and instantly I knew I had bigger problems than I expected...
Removing the tank only took the removal of a couple more bolts, so out she came. I scrutinized the tank and quickly found the culprit.... I think the photo says it all.

Ferrous cancer had finally eaten away at the tank and put a good size hole in the bottom. The only thing holding back a deluge of motion lotion was the tank sealant we had put in that tank 21 years ago.
So, now I'm about to install a spanking new fuel tank in the car. Hopefully this one will last as long as the original did!
Thursday, February 16, 2012
Get A Bigger Hammer!
I started making money as a mechanic when I was 12. That first job was on a lawnmower. I gained a lot of skills working in different shops around town. However, the most important lesson, I learned from my uncle and father.
Most of the lessons I learned in the shops were how not to get a job done right. Most of the wrench slingers I worked with were fast and generally effective, but they were not terribly accurate and exacting.

A carb would need rebuilding and they'd get it done. But the screws would all have rounded off edges from the wrong screwdriver being used. Have a job that needs a little force, hit it. Didn't budge? Use a bigger hammer! Bolt heads would have plier marks because they were too --insert adjective here (lazy, ignorant, hung-over, etc). They made the same money as me, but I think I felt better when I got home. Pride in a job done right is worth it.
My dad was different. He was never a paid mechanic, but he liked to do the job right. He took an almost strange pleasure from having the right tool for the job. I did not matter what the job was, he could find just the right wrench for getting the job done. Got a small phillips head screw, he'd find the right size screwdriver for that screw.
His modus operendi was perfect for little British cars!
There is an old saying 'Give an Englishman a piece of metal and he'll do something foolish with it'. Triumphs are true to this saying, and while they ooze character and charm, they also typically ooze plenty of other automotive products as well, with oil being the most common. Accessing many of the parts that would leak often took a contortionists physique and a cartoonist's imagination to figure out what kind of tool you needed to get the job done!
The Triumph TR6, being a blend of old and new had some odd, old features such as a paper element in bucket for a filter. It was bolted into place on the side of the block, with a substantial chunk of frame right in front of it. A snake's den of curling fuel, vacuum and hydraulic lines obstruct any attempts to get at the canister with a socket wrench. Box end wrench? Fuggeddaboudit!
Enter the flat, reversible ratchet wrench! Back when Dad found this one, these were not something you found at every big box home improvement store- those stores did not exist... Mom and Pop store? Nope. I really don't know how he found it, however he did, and now it remains part of the tools I maintain my '73 roadster with.

If you have a Triumph, make sure to get one of these. Nothing reaches the oil filter canister faster and easier. They are easier to get these days, so you have no excuse. Regardless of job, get the right tool for the job. The job will be done quicker, better, and you might even sleep better at night!
Where It All Began
My love of Triumphs goes back a long way. Farther back than myself as well.
My grandfather worked in the auto biz most of his life. Willys, Packard and a bunch of other long since dead American auto marques were his bread and butter. Unfortunately, after the GI's got home and bought their first cars, the market began to taper off and business went south for all those brands. My grandfather's business went south with it.
He stayed at it though, and eventually became connected with an import car dealership that sold Triumph among other brands.
My father grew up driving early Spitfires and TR4's. He would even ride on the parcel shelf of race prepared TR4's as a race driver employed by my grandfather drove them to and from the racetrack. That planted the seed of a very strong Triumph tree in my Dad.
Years later, Dad had his chance to get hold of a TR6. The size and character of a TR4, with slightly more rakish styling and gobs more power than a standard TR4. It did not hurt that it was more modern too! He restored the 74 1/2 he found and built a beautiful car. Hardtop, Overdrive and a Nardi steering wheel made the car even more special.
I was about 5 or 6 when he bought that car, and I grew up riding to car shows in the St. Louis area on the parcel shelf. We even road tripped around the Mid-west in that thing. They say that the acorn does not fall far from the tree, and yet another Triumph tree was planted- in me.
Dad promised his Six to me when I was old enough to drive. He sold it when I was about 8 or so and bought a bass boat. The bass boat was cool, but not nearly as cool as the Six!!!!
Time passed, but not mine and my father's love of Triumphs. So by the age of 12 I was looking in Hemmings Motor News and the classifieds in the local paper. I saved every buck I could earn mowing lawns and began to build a pretty good sum up. Dad made a deal with me that he would match every dollar I earned with one of his own and we searched for the right car together.
Then on summer vacation before my 15th birthday, we found it. Under a car cover, and with a goat standing on the bonnet, we saw the unmistakable silouette of a Triumph TR6. The cover was ragged and the car was worse. Motor did not turn over, brakes and tires were flat, and the interior was long since rotten. I think we found enough mouse homes to run a research center for years.

We started the restoration by rebuilding the brakes and clutch hydraulics. Rolling the car down the driveway and popping the clutch freed the locked motor. I don't remember how we got it back to the garage.
My uncle is a body man and knows how to straighten panels and lay some paint with the best of them. We took the car to his shop in Arkansas and the three of us worked our (his) magic over the period of a few weeks.


We continued that process for several weeks and after installing a new interior, we had a running car!!!!!!

Wednesday, February 15, 2012
What is this blog about?
Welcome to Coventry's Finest. This is my blog dedicated to the finest sportscar to ever come out of Coventry, England, the Triumph TR6!
More specifically, this blog is about my experiences as a 3rd generation Triumph fanatic, and 20 plus year owner of the best car the Triumph marque produced. I hope to pass on some good tech info, practical advice and good old fashioned rambling about my ramblings in my 1973 TR6.
I hope you come back often, and find yourself at least mildly entertained!

Subscribe to:
Posts (Atom)